
Fragrant greens, reds, blues, glistening sunlight on top of plump fruits and vegetables an arm’s reach away. Somewhere in this paradise, you know that Adam and Eve are still running around naked as jaybirds, laughing at talking snakes and perfectly contented by their naivety plus all of the delicious totally legal fruit they are free to consume. Scarcity? Hunger? Currency? No such thing. Obviously food just grows out of the ground like nature’s own Willy Wonka factory. Wait… can’t relate to this heaven on Earth? Then you need a DIY home hydroponics system.
Okay, hydroponics may not solve all of life’s woes, but the growing method uses little more than a pump, liquid growing solution, and indoor fluorescent lighting to grow and maintain plants without an outdoor garden. Your next-generation indoor tomatoes probably won’t be big enough to restore Eden, but will give you a little taste of paradise.
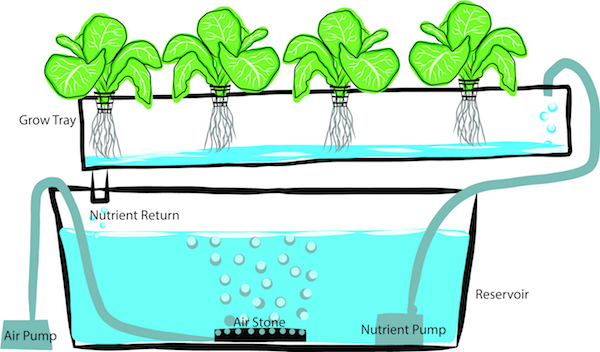
Oftentimes, store-bought hydroponics kits are needlessly expensive; the systems aren’t particularly hard to make yourself, so we’re going to take you through building your own hydroponic “ebb and flow” system. This relatively simple design consists of three main areas: a reservoir from which the solution will be pumped to the plants, a growing bed which is a walled surface where potted plants soak up the solution and grow, and an above-hanging light fixture. Check out this useful diagram from Hydroponics 101:
THINGS YOU’LL NEED
For light fixture:
– ½ inch PVC tubing (how much depends on how tall your system is, and how much support your lighting will need)
– Fluorescent grow lights
– 4 PVC T-connectors
– 4 PVC 90 degree connectors
– Ruler
– Saw
– Chain
– Light timer
For reservoir:
– Plastic tub (the size of your reservoir will dictate that of the garden but it should be large enough to hold enough liquid to water several plants)
– Small pump
– Hydroponic growing solution (MaxiGrow, for example)
– pH tester
For growing bed:
– Pots (must allow liquid to flow in and out)
– Short ½ inch PVC pipe (cut shorter than pot height – think drainage)
– Silicone sealant
– ½ inch drill
– Clay pellets (optional: they give tougher roots something to grab onto, ideal for some plants)
– Plastic container, similar to that used for the reservoir (doesn’t need to be as deep)
BUILDING THE LIGHT FIXTURE
1. Decide the length of your PVC pipes based on the intended size of the hydroponic garden. For a few plants, four ten-inch pipes should be sufficient for the base of the stand. The legs should be around a foot high.
2. Use the T-connectors to connect four pipes for the base.
3. Use the 90-degree connectors to attach the legs.
4. Wrap the chain around the base and use it to hang the grow light.
BUILDING THE RESERVOIR
1. Wash the container well and make sure to rinse out any excess suds.
2. Fill the container with the solution, making sure to follow any manufacturer’s instructions.
3. Configure the pump for use with the timer. It will need to be cycling the solution 3-5 times a day for around 20 minutes per cycle.
4. Insert the pump.
BUILDING THE GROWING BED
1. Drill two ½ inch holes at opposite ends of the floor of the bed. Insert a short PVC pipe into one and the pump hose from the reservoir into the other.
2. Seal the holes around the pipes with sealant.
3. If you’re using clay pellets, wash them and spread them in a thin layer across the floor of the growing bed.
Just like that, you’ve made your own personal paradise and brought tremendous convenience to your kitchen. Fresh vegetables and herbs are now close at hand, regardless of the season. But who’s to say you should stop there? TalkLocal can connect you to the perfect landscaper to bring fertility back to your dilapidated or weed-overrun garden, or get your yard ready for a new one. Get started and see all we can do for you (and for free)!


