Windshield crack repair kits are great tools to fix small cracks in your auto glass. They are available almost anywhere, from hardware stores to auto shops, and can help avoid more severe glass damage. After purchasing your car windshield crack repair kit, follow these steps to remove any small rock chips and bulls-eye cracks.
Do NOT perform this repair in direct sunlight. Your work will not result in an attractive repair because the heat will cause the resin to harden too quickly. Also, windshield crack repair kits will not repair larger windshield runs.
1. Clean the area around the crack. Use the razor blade included in your kit to scrape away any loose pieces of glass. You also need a clean area around the crack to attach the suction cup tool, so feel free to clean the area with Windex. Make sure the area fully dries before continuing on to the next step.
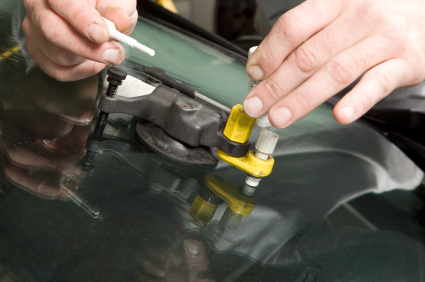
2. Place the suction cup tool. Make sure to place the tool so that the threaded center section is directly over the chipped area. Firmly place the suction cups into place, securing the four arms of the tool.
3. Insert the threaded repair tool. Once the suction cup tool is centered directly over the crack, insert the threaded repair tool. Screw it in tightly by hand.
4. Check the tool alignment. Make sure that the rubber end of the threaded tool is directly above the chip in your windshield. If it is not aligned, then reposition the tool.
5. Add the windshield repair resin. Open up the tube of repair resin and add it to the repair tube. It’s okay to add a few more drops than stated in the directions to be safe. You can’t use too much, but using too little will add a lot of time to the repair process.
6. Insert the plunger. You should quickly insert the center plunger right after you add the repair resin. Then, tighten the plunger almost all the way down. You’ll be able to tell you are adding enough pressure because the plunger will become more difficult to screw in. After reaching the limit, loosen the plunger a little to let air bubbles to escape. Then re-tighten it.
7. Remove the tool and apply the finishing film. Give the resin a few minutes to fully penetrate the chipped glass before completely removing the suction tool. Quickly place a section of the clear finishing film over the still-moist repair area. Carefully press the resin toward the edges of the film using the razor blade, making the film as thin and even as possible. You can add tape to the edges of the film to make sure it won’t slide around while the resin is settling.
8. Finishing touches. Wait about 10 to 20 minutes until the resin completely dries before removing the film. Clean up your repair by scraping the excess resin from the windshield with the razor blade. Then, sit back and admire your beautiful repair work.
If you feel more comfortable letting a professional handle the work, use TalkLocal to find a high quality auto glass repairman.


