Archive for the ‘talklocal’ Category


DIY Furniture Refinishing: Make Old Furniture Shine Like New

Wednesday, August 26th, 2015

Does your furniture look like it’s about to go past the point of no return? Only the most unsightly furniture needs complete refinishing (if you just have a few white rings, check out this article where we focus on furniture makeovers). However, if your table is severely chipped, extensively worn, or deeply blemished, then these DIY furniture refinishing tips will help you strip the old finish and lay down some new shine.

shutterstock_280851356

STEP 1: Stripping Old Finish

Most finishes can be stripped with sandpaper, but if they prove stubborn, you’ll have to use special products. Which product depends on the type of finish. Fortunately, applying the most effective tools to remove each finish is a simple first step in an equally simple (yet labor intensive) process.

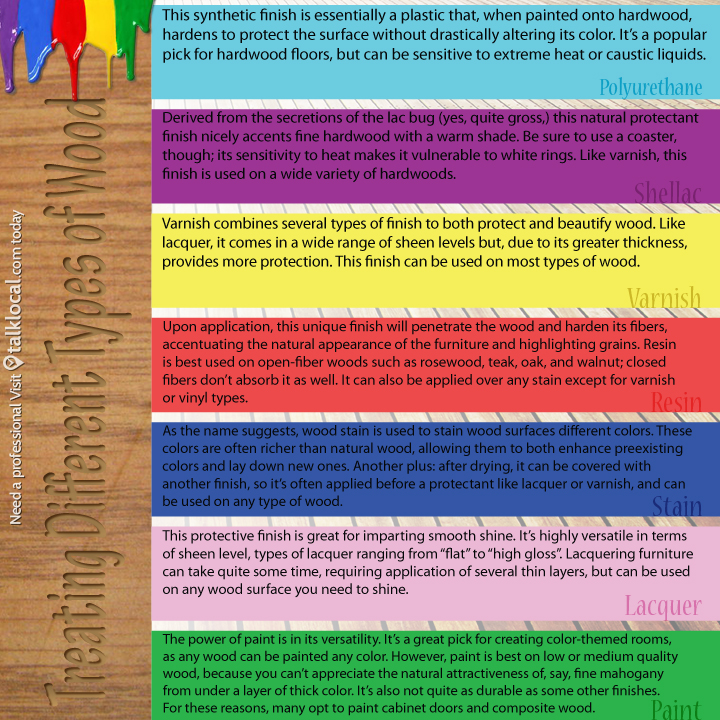
Finish: paint, shellac, acrylic, lacquer, varnish

Required: High-grit sandpaper fixed to a sander or block

Many finishes can be scraped up with 150-grit sandpaper. Move to 220-grit to get the finer areas and then remove excess dirt with a damp rag. If sanding proves ineffectual, you might have to take a trip to the hardware store for specialized products.

Finish: Acrylic or paint

Required: Chemical stripper

Only use chemical stripper in a well-ventilated area with gloves and goggles as its ingredients are caustic and dangerous to the eyes. Apply with a rag and clean it up with steel wool by rubbing along the wood grain.

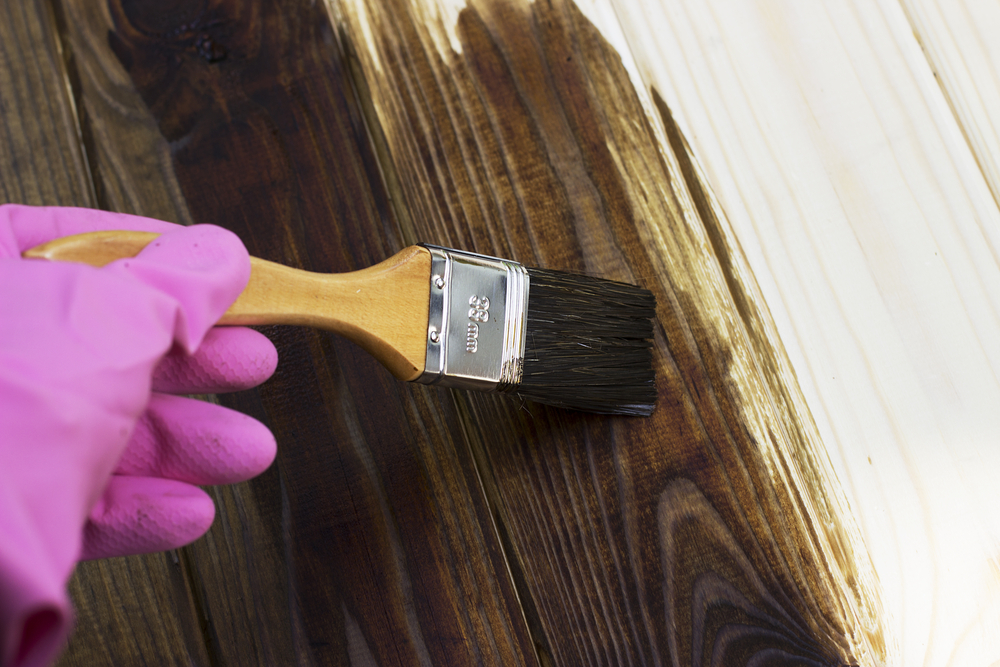
STEP 2: Applying Wood Stain

After stripping the old finish, wetting the surface of the wood will show what it’ll look like with finish applied. Incorrect or poor color can be corrected by applying wood stain with a rag. High-quality hardwood responds best to gel stain. Wipe in the direction of the grain, taking care to distribute it evenly, and remove excess with another wet rag.

Let the stain dry. If its appearance is not satisfactory, the stain can be liquefied by applying more on top, which will allow you to remove it or change its distribution.

STEP 3: Laying Down New Finish

Here’s our guide to picking the best finish for your furniture. In this walkthrough, we’ll cover two common ones – which to use depends on how much you’ll be using this furniture. If heavily, opt for oil-based polyurethane, which is more durable than water-based finishes; if not, use wiping varnish, which will look a bit sleeker.

 Applying polyurethane requires a few steps. First, apply the base layer with a foam or bristle brush in the direction of the grain. Let it dry overnight, even it out with 280-grit sandpaper and clean off any dust. When the surface is even, lay down a second coat as you would a layer of paint, brushing with the grain (pop bubbles by brushing them over).

Applying wiping varnish is essentially the same procedure – just take care not to lay down excess varnish, as it can result in unsightly buildup when dry.

Take a moment to admire your work! Refinishing furniture is not a simple task; if you’ve done it yourself, that’s something to be proud of. If this long and messy procedure isn’t for you, try a much simpler solution: TalkLocal. Our free and unique system will match you up with the perfect pro to get that furniture refinished on your  schedule – and it’s a lot more fun than watching finish dry.

5 Fall Vegetable Gardening Tips for your Eager Green Thumb

Friday, August 21st, 2015

iStock_000069446443_Large.jpg

Autumn calls to mind images of  falling leaves, changing weather, and kids in new clothes waiting nervously for the school bus. In this season of change, we also can’t help but think of the upcoming holidays where friends and family come for the company and stay for delicious meals.  One way to make every meal even more special is to use vegetables from your very own home garden. Surprisingly, may of the most nutritious seasonal vegetables are best planted in fall. Some notable fall friendly vegetables include broccoli,  carrots, kale, spinach, and garlic.

So, whether you’re looking for a fulfilling way to spend your down time with the kids heading off to school, or if you want an outdoor activity to bring you all together between dance class and soccer practice; now is the perfect time to start your very own vegetable garden with some helpful fall vegetable gardening tips. Before getting your bucket and spade…

Check out this step-by-step process for getting more green out of your garden this fall. 

1. Choose the location of your garden wisely. Make sure your vegetables will be exposed to up to eight hours of sunlight daily and ample rainfall. Healthy soil is slightly moist and loose enough to be penetrated by roots.

2. Check each seed pack for how much space your vegetables need, as the amount varies greatly. For example, carrots and broccoli usually only require two to four inches between plants, while kale can require up to a foot.

3. Ensure that the pH of your chosen soil is ideal for your vegetables. Carrots, for example, prefer more acidic soil; to prepare an ideal environment, you can even add lime to the soil.

4. Be aware of your climate. Fall vegetables are not well-suited for summer heat, so if it lingers in your area, it might be better to start the seeds with a simple indoor hydroponic setup – or you can plant them a little bit deeper, where it’s typically a few degrees cooler.

5. If your seeds are outside and temperatures are above Fall average, give them extra water to compensate for evaporation. After germination, you can water heavily once a week rather than lightly every day if you find it more convenient.

After you’ve taken all of these precautions (along with spreading a tarp over the areas of your garden prone to freezing at night), you’re ready to raise that green thumb. But if your yard is a bit rougher, with soil too dense, rocky, acidic, basic, whatever, for plant life, and your schedule a little packed to do something about it, we have the perfect solution for you: TalkLocal. Our unique and free search system will connect you with the perfect landscaper to turn an ordinary backyard into a rich, money-saving garden.

DIY Home Hydroponics System: The Herald of a Utopian Tomorrow (Kinda)

Thursday, August 20th, 2015

shutterstock_250289425

Fragrant greens, reds, blues, glistening sunlight on top of plump fruits and vegetables an arm’s reach away. Somewhere in this paradise, you know that Adam and Eve are still running around naked as jaybirds, laughing at talking snakes and perfectly contented by their naivety plus all of the delicious totally legal fruit they are free to consume. Scarcity? Hunger? Currency? No such thing. Obviously food just grows out of the ground like nature’s own Willy Wonka factory. Wait… can’t relate to this heaven on Earth? Then you need a DIY home hydroponics system.

Okay, hydroponics may not solve all of life’s woes, but the growing method uses little more than a pump, liquid growing solution, and indoor fluorescent lighting to grow and maintain plants without an outdoor garden. Your next-generation indoor tomatoes probably won’t be big enough to restore Eden, but will give you a little taste of paradise.

Oftentimes, store-bought hydroponics kits are needlessly expensive; the systems aren’t particularly hard to make yourself, so we’re going to take you through building your own hydroponic “ebb and flow” system. This relatively simple design consists of three main areas: a reservoir from which the solution will be pumped to the plants, a growing bed which is a walled surface where potted plants soak up the solution and grow, and an above-hanging light fixture. Check out this useful diagram from Hydroponics 101:

shutterstock_157397657

THINGS YOU’LL NEED

For light fixture:

– ½ inch PVC tubing (how much depends on how tall your system is, and how much support your lighting will need)
– Fluorescent grow lights
– 4 PVC T-connectors
– 4 PVC 90 degree connectors
– Ruler
– Saw
– Chain
– Light timer

For reservoir:

– Plastic tub (the size of your reservoir will dictate that of the garden but it should be large enough to hold enough liquid to water several plants)
– Small pump
– Hydroponic growing solution (MaxiGrow, for example)
– pH tester

For growing bed:

– Pots (must allow liquid to flow in and out)
– Short ½ inch PVC pipe (cut shorter than pot height – think drainage)
– Silicone sealant
– ½ inch drill
– Clay pellets (optional: they give tougher roots something to grab onto, ideal for some plants)
– Plastic container, similar to that used for the reservoir (doesn’t need to be as deep)

BUILDING THE LIGHT FIXTURE

1. Decide the length of your PVC pipes based on the intended size of the hydroponic garden. For a few plants, four ten-inch pipes should be sufficient for the base of the stand. The legs should be around a foot high.

2. Use the T-connectors to connect four pipes for the base.

3. Use the 90-degree connectors to attach the legs.

4. Wrap the chain around the base and use it to hang the grow light.

BUILDING THE RESERVOIR

1. Wash the container well and make sure to rinse out any excess suds.

2. Fill the container with the solution, making sure to follow any manufacturer’s instructions.

3. Configure the pump for use with the timer. It will need to be cycling the solution 3-5 times a day for around 20 minutes per cycle.

4. Insert the pump.

BUILDING THE GROWING BED

1. Drill two ½ inch holes at opposite ends of the floor of the bed. Insert a short PVC pipe into one and the pump hose from the reservoir into the other.

2. Seal the holes around the pipes with sealant.

3. If you’re using clay pellets, wash them and spread them in a thin layer across the floor of the growing bed.

Just like that, you’ve made your own personal paradise and brought tremendous convenience to your kitchen. Fresh vegetables and herbs are now close at hand, regardless of the season. But who’s to say you should stop there? TalkLocal can connect you to the perfect landscaper to bring fertility back to your dilapidated or weed-overrun garden, or get your yard ready for a new one. Get started and see all we can do for you (and for free)!

Preparing Your Car For Winter: Five Tips for Fall

Wednesday, August 19th, 2015

rsz_4cartipsdiy

Fall is a precursory season, often spent running around for winter clothes, school supplies, gas, and heater repairmen – and for good reason: nobody wants to brave a snowstorm in a t-shirt or take notes on the backs of their hands. Of course, no matter how prepared you are for the upcoming season, if you’re not preparing your car for Winter, you’re running a high risk of getting stranded in the worst possible weather conditions. So, don’t let Winter car maintenance fall through the cracks this year.

Here are four easy DIY tips for getting your car ready for the Winter weather.

Engine Oil Check

If you don’t check your engine’s oil level monthly, start this new habit. It only takes a minute or two.
– When checking your engine’s oil level, the dipstick is your best friend
– Wait until your engine has cooled down, and then locate the dipstick in your vehicle
– Take it out of the dip tube and clean it, then push it back in until it fits in the tube again
– Wait a minute or two, then take it out again and check the level of the oil. If it is between the two dots, or the high and low marks, then you’re good to go
– Credit: Car Bibles

Battery Check

Experts recommend testing your battery every Fall to lower the chances of it failing due to cold weather.
– Check your car’s battery yourself is a bit more complicated, so we found a helpful video from a reliable source to walk you through the process

Windshield Wipers Check

Wipers should be replaced every Fall so you have new wiper blades that can battle the cold weather; it’s quick, easy and inexpensive to do yourself.
– Lift your wiper blade, and push the tab under the wiper to remove the blade
– Then attach the new blade – easy as pie

Tire Pressure Check

Tire pressure should be check every Fall because it tends to drop as the weather becomes colder.
– Wait until your vehicle has been sitting for a few hours – the colder your tires are, the more accurate the reading
– Try to use a tire gauge, and not a built-in one on an air compressor
– Then add (or release) air from the valve stem of the gauge until your tire’s pressure matches its recommended level

Also, no matter where you are make sure to have a snow brush and ice scraper packed in your trunk. We are huge advocates for safety,  so we recommend buying a car emergency kit. This one from Survival Supply is around $20 and is overstuffed with useful tools:

shutterstock_281773370

If you are on a time crunch and can’t get to everything, give us a shout out at TalkLocal and we will place a request for a mechanic for you.

Safe Travels and Happy Fall!

Picking The Best Wood Finish: Find The Finest Shine

Monday, August 17th, 2015

A pristine piece of wooden furniture is a rare opportunity to pick a finish that both screams class and withstands the elements. It’s a bit of work to do right, but as we all know, well-treated wood is a beautiful thing, so your fresh (or freshly stripped) furniture only deserves the best wood finish. Educate yourself on the uses of all the different types of finish with this final installment in our finish guide (we’ve also covered finish maintenance and DIY refinishing).

Finish tends to be flexible so, for the most part, your only constraints are how intensely the furniture will be used and what kind of atmosphere you wish to create. Let’s run through the different types of finish and what they’re good for.

 –        Paint: The power of paint is in its versatility. It’s a great pick for creating color-themed rooms, as any wood can be painted any color. However, paint is best used on low or medium quality wood, simply because you can’t appreciate the natural attractiveness of, say, fine mahogany from under a layer of thick color. It’s also not quite as durable as some other finishes. For these reasons, many opt to paint cabinet doors and composite wood.

–        Lacquer: This protective finish is great for imparting smooth shine. It’s highly versatile in terms of sheen level, types of lacquer ranging from “flat” to “high gloss”. Lacquering furniture can take quite some time, requiring application of several thin layers, but can be used on any wood surface you need to shine.

–        Stain: As the name suggests, wood stain is used to stain wood surfaces different colors. These colors are often richer than natural wood, allowing them to both enhance preexisting colors and lay down new ones. Another plus: after drying, it can be covered with another finish, so it’s often applied before a protectant like lacquer or varnish, and can be used on any type of wood.

–        Resin: Upon application, this unique finish will penetrate the wood and harden its fibers, accentuating the natural appearance of the furniture and highlighting grains. Resin is best used on open-fiber woods such as rosewood, teak, oak, and walnut; closed fibers don’t absorb resin as well. It can also be applied over any stain except for varnish or vinyl types.

–        Varnish: Varnish combines several types of finish to both protect and beautify wood. Like lacquer, it comes in a wide range of sheen levels but, due to its greater thickness, provides more protection. This finish can be used on most types of wood.

–        Shellac: Derived from the secretions of the lac bug (yes, quite gross,) this natural protective finish nicely accents fine hardwood with a warm shade. Be sure to use a coaster, though; its sensitivity to heat makes it vulnerable to white rings. Like varnish, this finish is used on a wide variety of hardwoods.

–        Polyurethane: This synthetic finish is essentially a plastic that, when painted onto hardwood, hardens to protect the surface without drastically altering its color. It’s a popular pick for hardwood floors, but can be sensitive to extreme heat or caustic liquids.

Start your DIY furniture refinishing project off right with this simple guide but if you’re short on time or far from a hardware store, take a break with TalkLocal. Our unique and speedy system will hook you up with the perfect furniture upholsterer for your needs and schedule – for free! Save both time and money so you can soon plan for a party and show off your fabulous wooden furniture.

best wood finish

Fixing Warped Hardwood Floors is Easier than It Looks

Friday, August 14th, 2015

Warped hardwood floors are troubling. Nobody wants to see their beautiful wood floor bulging at the center (crowning) or lifting at the edges (cupping) – but luckily, these issues can be solved without ripping up the whole floor. Warping happens when wood absorbs an uneven amount of moisture; the more saturated areas will expand and protrude. This is why the first of the four techniques we’ll show you for fixing warped hardwood floors involves warping them back into place!

Counter-Warping (For Minor Warps):

This technique can only be used if the warp is minor and the wood still somewhat pliable. All you need to do is wet down the warped area and place a cinder block or two over it for 24 hours. The weight of the cinder blocks (which you can get at your local Lowe’s or Home Depot) should force the wood to press back into uniformity with the rest of the floor.

Sanding Down (For Minor to Intermediate Warps):

It’s a little more labor-intensive, but more severe warps can be handled by fitting a drum sander with 20-grit paper and vigorously sanding in a diagonal motion. You’d be surprised how much of the thickness of the wood can be removed with this technique. Because you’ll need to apply a new finish afterwards, try to use progressively finer sandpaper as you grind the wood down further.

Replacement (For Severe Warps):

You should only rip up and replace the wood after exhausting all other options. Start by finding a suitable replacement, and then get up the old floor. This procedure will vary depending on what type of wood your floor is made of and how it’s been fixed to the floorboards. Fix the new wood in its place, and then treat it so it looks uniform, using paint, stain, or finish.

TalkLocal (For Extreme Warps):

The nastiest of warps are best handled by a professional. Let us take care of that for you. Head over to TalkLocal, where we’ll give you free, full access to our unique search system; with our help, the experience of finding a handyman will be smoother than your beautiful new floor.

Reupholstering Chairs and Sofas: Make Your Old Furniture Like New

Wednesday, August 12th, 2015

shutterstock_4702978

Got ripped, stained, or otherwise blemished upholstery? A little bit of DIY initiative can save you the time and money you’d otherwise spend on a professional upholsterer. Reupholstering a chair or sofa isn’t as complicated as it seems; all you’ll need is a knife, thread, sewing machine, and a staple gun.

It may not be necessary to reupholster your old furniture just because the cover is stained so first, we’re going to teach you how to remove stains from your upholstery with this DIY cleaning solution.

DIY homemade upholstery cleaning solution

Upholstery stains can easily be taken care of but it’s best to know if your upholstery is synthetic, like nylon or polyester, or natural, like cotton or wool.

If your upholstery is synthetic, you can make a cleaning solution by mixing water and white vinegar well in a 2:1 ratio and applying it from a spray bottle. If the stain doesn’t lift after scrubbing the wet area with a rag and letting it dry, try again after mixing in a tablespoon of liquid soap for every 4 cups of water.

Natural upholstery is more safely cleaned with a 1:1 mixture of water to liquid dish soap. Apply lightly with a sponge and scrub lightly with a rag until the stain is lifted.

Reupholstering Chairs and Sofas

If you’re going to reupholster the entire thing, the first step is to remove the old upholstery. Whether you’re dealing with a sofa or a chair, you should always start at the bottom, as that’s where the most material is used. If you can find where the upholstery was fixed to the furniture, see if you can remove whatever was fastening it, like a line of staples. If you can’t, just take your knife and cut it free from the furniture.

After the bottom is removed, turn it upright. If it’s a sofa: remove the back, followed by the sides, the inside back, and then the inside arms. If it’s a chair: remove the upholstery on both sides of the back. Try not to damage the old upholstery too much; it’ll be a useful guide for the new cover.

Lay out your new upholstery over the old and cut the fabric. If the old upholstery was seamed, cut a ½ inch from the old seam, or if it was stapled, cut 2 inches from the staples. Next, sew the pieces of fabric together using heavy duty thread and a sewing machine, allowing for a ½ inch inlay.

Next, start attaching the fabric to the furniture using a staple gun. This process is relatively straightforward for a chair, but for a sofa, you’ll have to work inside-out: start with the sofa deck, followed by the inside arms, and then the inside back. Remove any excess fabric and you’re done!

If you don’t have the time to reupholster yourself, find a professional. Before you bloat your computer with search tabs, try TalkLocal – just enter the info of the job you need done and let our unique search system find you the perfect furniture upholsterer for your needs and schedule.

Picking the Right Home Humidification System

Friday, August 7th, 2015

shutterstock_259625273

Did you know that low humidity contributes to dry skin, scratchy throats, and a persistent parched feeling? Or that when humidity is low, more airborne dust and dander assail your lungs causing irritation and exacerbating allergy and asthma problems. Even the cracked hardwood, peeling wallpaper, and difficulty opening and closing doors can be attributed to extremely dry indoor air. Who knew all this could happen right around you? Fortunately, the right home humidification system can improve your health, protect your home, and bring comfort.

Here are things to consider when picking the right home humidification system.

Deciding: Room Humidifiers vs. Whole House Humidifiers

Which of the above you choose depends on where you find your home uncomfortably dry. If you want just your bedroom or kitchen to be more humid, then you should get a room humidifier; if the problem is spread throughout the house (you might see hardwood floors splitting or wallpaper peeling in several rooms), it’s likely more cost-efficient to invest in a whole house humidifier. Though their initial cost is higher, whole house humidifier systems are typically cheaper to run over time and can be controlled from your central HVAC unit.

Types of Room Humidifiers

If you’ve decided to go with a room humidifier, use the volume of the room to determine what gallon-output humidifier you need and then pick a type. There are three types of room humidifiers:

Steam vaporizers – These use a heating element to, as you could guess, turn water to steam. Honestly, it’s not the best investment, as the same effect can be achieved with a pot of boiling water (as long as you’re careful).

Warm mist humidifiers – These release vapor in the form of a clean, transparent mist that tends to warm the room a bit.

Cool mist humidifiers – Also known as “impeller” or “evaporative” humidifiers, these release cool, clear, and clean water vapor into the room – and unlike the previous two, will not heat the room.

Space Volume

Consider the size of the area in need of humidity in terms of volume. For those of us who don’t remember fourth grade science class, volume is equal to length times width times height; this translates to the square footage of your floor times the height in feet to your ceiling. If you’re looking for whole home humidification systems, calculate this for each room in the house and all of the hallways for the total volume of your home. Seek humidifiers accordingly, as this is the amount of space into which it will need to push humid air.

One final thing: if you decide to go for a whole home humidification system, you’ll want to set up a time with a certified HVAC technician to get everything set up. So, head over to Talklocal and let us take care of all of that research and scheduling for free while you prepare to feel the difference your new humidifier will make.

College Back to School Month: Preparing for a Future 4.0

Wednesday, August 5th, 2015

Let yourself relax for a second. Whether you’re a soon-to-be college student nearing the end of the hurdle, the parent guiding them along, or a returning college student looking to resupply before next semester, shopping for college back to school month can be quite an undertaking – and everybody knows effective shopping requires a cool head.

Here are a few steps to take the hassle out of the process:

1)      Make a list: Some smaller shopping jobs can be done off-the-cuff; this will not be one such trip. Consider all of the things that college calls for – it may help to do so in terms of the rooms of the house. Think about the bedroom, bathroom, kitchen, living room, office. Research and refer to the materials the school has given you to see what appliances will and will not be allowed.

2)      Schedule: Wake up early for this; it’s not going to be quick. You’ll want to make enough space in the day to fit shopping as well as whatever else you had planned previously. If you can’t, it might be wise to spread it over a few days.

3)      Think efficiency: Which stores do you need to hit? You’ll waste time and gas money by driving in circles around town, just like you’ll waste energy by running haphazardly around a department store. You should have a good idea as to where you’re going, for what, when, and what’s nearby.

4)      Keep repairs in mind: There are some things you probably already have, like a computer, a phone, a calculator, and maybe even an old TV. There’s no sense in replacing that which can simply be fixed.

5)      Plan for the journey ahead of time: This step is often overlooked, but so important: no matter the size of the school, there are likely to be hordes of families trying to move into first and second year dormitories, so you’ll need to be smart about how you plan to move in. Consider and plan for factors such as move-in time, moving logistics, parking, traffic on the way, the length of the trip, and if your car is up to the task.

If you don’t have a go-to guy for your tech repairs or car maintenance, we can help with that. Head over to TalkLocal and we’ll fix you up with just the guy you need, free of charge and headache, quicker than you can say “I’m feeling lucky.”

back to school infographic

DIY Furniture Polish Recipe: Save Yourself the Trip

Monday, August 3rd, 2015

DIY

Ever find yourself relaxing on your favorite love seat when a furniture commercial rolls across your screen and tempts you to replace everything not nailed down? Your whole house seem so pale, crack, and decayed in comparison to all the shiny new furniture on the TV. Then, just before going online and making some huge purchase you’ll probably regret, you remember all of the great memories you’ve created with the stuff you’ve got, how it’s still sturdy and fits you still. Sure, your furniture is beginning to look a bit…eh. But nothing too serious that it can’t be helped with a little love and a simple retouch.

Luckily, you can gratify your desire for newer looking furniture without breaking the bank or even leaving the house. You probably have all the ingredients for this handy dandy DIY furniture polish recipe laying around. Even if you are fresh out of common grocery items, like olive oil and white vinegar, you probably planned on picking them up at the market today, didn’t you?

Here’s a recipe for a DIY furniture polish that delivers instant gratification without buyer’s remorse.

Supplies Needed:

– A funnel
– Measuring cups
– Spoons
– A bottle
– A rag

Three Ingredients:

– 2 tbsp of  olive oil
– ¼ cup of white vinegar
– ¼ cup of lemon oil or juice

Here are the four simple steps:

1. Use the funnel to pour all ingredients into bottle.

2. Shake well.

3. Pour polish onto rag and rub onto wood finish in the direction of the grain. Take care to evenly distribute the polish.

4. Remove excess polish with clean cloth.

Does your furniture need a more intense touch-up? Then check out our blog about DIY furniture makeovers. As for those furniture jobs that are too big to tackle yourself, get a professional. Head over to TalkLocal and we’ll fix you up with the perfect furniture upholstery cleaning professional  before the commercial break is over.