Posts Tagged ‘DIY’


Keep Your Water Cooler Running

Friday, May 13th, 2016

keep your water cooler running

The water cooler is the hub of all things fun at the office. It’s a place to exchange ideas and jokes amongst co-workers. It’s the lifeline to the outside world. Well… wouldn’t it be terrible if your water dispenser suddenly broke down? Suddenly, you’re left with nothing but a giant bottle of water, sitting there and mocking you. Here’s some tips on how to avoid accidents and keep your water cooler in tip-top shape:

– Clean tray. Keep things hygienic by cleaning your water dispenser place with multiple hands and bottles in. Make sure to clean the tray where the water is dispensed. Use a household disinfectant or make your own (2 teaspoons of bleach per gallon of water) to clean this area to prevent mold growth.

– Change the filter. If your dispenser has a filter, make sure to change it regularly as directed by the packaging. It’ll keep the water fresh and free of impurities.

– Flush out the system. Add 1 tablespoon of baking soda to 1 gallon of warm water to flush out the drained system. This helps to disinfect your system and keeps your water tasting fresh.

– Reboot. If there seems to be a problem with your machine, such as not having cold water, you should unplug and replug the water cooler. Also, make sure that the cold water switch is on.

– Call a handyman. If something’s wrong with your dispenser and you’re not quite sure what it is or how to fix it, it may be time to call a handyman to fix the problem. Let TalkLocal help connect you with a local pro for free.

– Buy a new one. If all else fails, buy a new one. You can buy a best selling water cooler for $99.99 on Amazon as of April 29, 2016.

We hope these tips help keep your water cooler running and the conversations flowing.

Essential DIY Tools for Your Toolbox

Monday, August 31st, 2015

shutterstock_324217205

There are more useless money-suckers than good products these days; this is especially visible in the market for household maintenance tools. You search for cool DIY tools, expecting something at the crossroads of utilitarian and innovative, but all you seem to find are Allan keys with vice grips, PSI gauges, and sextants attached.

Here at TalkLocal, we think a sextant sounds like something nobody is interested in, so we’ve compiled a list of DIY tools to help you declare independence from your contractor and feed your increasingly addictive DIY hobby.

Essential DIY Tools

These should be in any toolbox:

– Adjustable wrench
– Screwdriver set
– Tape measure
– Electric drill (worth the price, trust us)
– Level
– Hammer
– Nailset
– Pliers
– Utility knife
– Flashlight
– Sandpaper and sanding block (whenever dealing with wood)
– Safety goggles and gloves
– Super glue
– Duct tape and WD-40 (seriously)

Useful Extras (Your pipes won’t burst without them but they’re not superfluous):

– Crowbar
– Staple gun
– Rubber mallet (good for tapping together laminate)
– Dremel
– Hot glue gun
– Automatic nailer and circular saw (useful for woodworking projects)
– Jigsaw (another useful woodworker’s tool)
– Multi-tool (those Swiss Army knife-things with a million tools – if you think they look unwieldy and useless, consider that these are essentially whole toolboxes you can fit in your pocket!)

Gather these together over time; they’re too expensive to buy all at once, and you might not end up needing all of them. Instead, get the ones that seem necessary for the project at hand, and make sure it’s a project you actually can tackle yourself so you don’t waste money

For all of those tasks too big, too onerous, or too time-consuming for a mere mortal with a toolbox, let us handle it. Go onto TalkLocal and our unique search system will put an end to that obnoxious research-call-repeat headache.

Fixing Warped Hardwood Floors is Easier than It Looks

Friday, August 14th, 2015

Warped hardwood floors are troubling. Nobody wants to see their beautiful wood floor bulging at the center (crowning) or lifting at the edges (cupping) – but luckily, these issues can be solved without ripping up the whole floor. Warping happens when wood absorbs an uneven amount of moisture; the more saturated areas will expand and protrude. This is why the first of the four techniques we’ll show you for fixing warped hardwood floors involves warping them back into place!

Counter-Warping (For Minor Warps):

This technique can only be used if the warp is minor and the wood still somewhat pliable. All you need to do is wet down the warped area and place a cinder block or two over it for 24 hours. The weight of the cinder blocks (which you can get at your local Lowe’s or Home Depot) should force the wood to press back into uniformity with the rest of the floor.

Sanding Down (For Minor to Intermediate Warps):

It’s a little more labor-intensive, but more severe warps can be handled by fitting a drum sander with 20-grit paper and vigorously sanding in a diagonal motion. You’d be surprised how much of the thickness of the wood can be removed with this technique. Because you’ll need to apply a new finish afterwards, try to use progressively finer sandpaper as you grind the wood down further.

Replacement (For Severe Warps):

You should only rip up and replace the wood after exhausting all other options. Start by finding a suitable replacement, and then get up the old floor. This procedure will vary depending on what type of wood your floor is made of and how it’s been fixed to the floorboards. Fix the new wood in its place, and then treat it so it looks uniform, using paint, stain, or finish.

TalkLocal (For Extreme Warps):

The nastiest of warps are best handled by a professional. Let us take care of that for you. Head over to TalkLocal, where we’ll give you free, full access to our unique search system; with our help, the experience of finding a handyman will be smoother than your beautiful new floor.

How To Fix a Kicked In Door (we don’t need to know why)

Wednesday, July 29th, 2015

Someone in your household has decided that life is too short to be stopped by a hinged block of wood and, as a result, has delivered terrible wrath upon your door. Whether you’re a frat boy doing damage control before your chapter’s president does his rounds or an irritated homeowner seeking to save money, you might be able to fix a kicked in door yourself – it just requires a bit of time and a few materials from your local hardware store. (If you’re the victim of a break-in, be sure to call the police before attempting to fix your door, as it might become evidence in a criminal investigation.)

Here are a few steps to restore your door to its former glory:

1) Obtain all the necessary materials. You will need a putty knife, diagonal pliers, a screwdriver, wood glue, clamps, chisel, 11/4-inch finish nails, a hammer, a set of nails, a putty crayon, and a stain marker. In some cases, you may also need replacement casing, and a miter saw…and it’s not a bad idea to get thick gloves for safety.

2) Determine specifically how your door has been damaged. Typically, a door is broken in by a kick landing just above the knob, which causes a split in the jamb (the part of the frame across the stop from the hinges) running up to the casing (the top part of the frame). Remove the casing with the putty knife and use the pliers to remove any remaining nails.

Door Diagram

3) Carefully remove any parts of the wood that are chipped off using the putty knife. If the casing is damaged, it must be replaced.

4) Look at the strike plate, the long piece of metal nailed into the frame around the lock. If the crack runs behind it or the strike plate is damaged, remove it using the screwdriver.

Strike Plate.png

(Credit)

5) If the jamb has been displaced, push it back to its original position and clean out any debris using the putty knife. If the jamb cannot be pushed together tightly, it must be replaced. Put the glue on the putty knife and spread it on the inside of the crack, and then push the sides of the jamb together with clamps until they fit together tightly. Let the glue dry for an hour, and then remove the clamps.

6) Screw back on the striker plate, if necessary.

7) Nail the casing back onto the frame with the nail set and hammer. Putty any holes with a putty crayon of matching color, and use the stain marker to color over where the jamb was split, after removing excess glue.

Of course, if you’re short on time or the damage is too extensive, head over to TalkLocal – we’ll help you find the perfect contractor without the research-schedule-wait headache.

DIY Faux Brick Wall Installation: Swanky Indoor Styles

Friday, July 3rd, 2015

shutterstock_322214192

Brick is everywhere these days – restaurants, swanky bars, modern homes – and for good reason: nothing adds a rustic touch like indoor brick walls. DIY faux brick wall installation isn’t that hard and it’s much cheaper; also, like laminate flooring, it looks convincing. Follow these easy steps to spice up your home.

1)      Measure your wall and decide how many bricks you need, as well as if you’re going to need to create special templates for windows and light fixtures, which can easily be done with cardboard and a box cutter or scissors. Faux brick wall tiles can be bought at almost any DIY store, or ordered from Home Depot online.

2)      Decide on a color scheme. You may be able to choose any, but in some cases, important furniture will require that you use certain colors. Though you can buy faux brick in almost any color, they can be painted to whichever you like.

3)     Saw the panels to conform to your templates.

4)      Get a hammer, nails, safety gloves, a nail gun, and caulking equipment. The panels can be easily affixed to the wall, no catch – just make sure you’re not obstructing objects on your walls by properly cutting down the panels.

5)      Make sure to caulk the panels down to fill in any cracks or spaces.

Small DIY home improvement projects like these can be fun and easy – but if you have a bigger project on your hands and lack the time or space to do it, get a professional. Head over to TalkLocal and we’ll fix you up with the perfect contractor for all your home improvement needs.

DIY Laminate Flooring Installation: Experience Q&A

Thursday, June 18th, 2015

shutterstock_250769293

TalkLocal marketing strategist Dallea Caldwell recently renovated her own floors, replacing the kaleidoscope of carpet and vinyl and wood with a single layer of smooth Beachwood laminate. For those interested in DIY laminate flooring installation, we’ve interviewed her about the experience.

Q: Dallea, why did you decide to do your own renovation rather than hiring a professional contractor?

A: The big thing was the cost. I did a bit of research and found out I could save around $2000. I knew going in that I wanted to use laminate flooring – I’d seen Beachwood in stores and liked how it looked – and, as it turns out, laminate is pretty easy to install.

Q: Walk me through the process – what’s the first step in a DIY project like this?

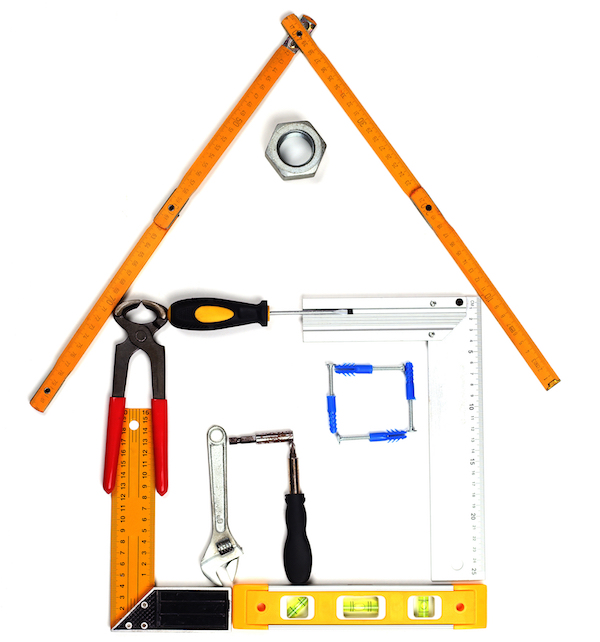
A: Getting the proper materials. I had a bit of DIY experience so I knew right away, I was going to need mallets and saws – a bunch of them. Specifically, I needed round saws, handheld saws, rubber mallets, and these rubber plants called tappers, which are used to tap together the interlocking layers of the laminate. But the biggest thing was help: renovating flooring requires manpower! So I called up some family members and told them to bring other necessities, like crowbars, hammers, saws, siding and such.

Q: After everyone had arrived and you had all your tools, how did you start?

A: Part one, the hard part, was getting up the flooring you already have. It was quite a task due to the smorgasbord of flooring types in my open-layout first floor; it was like a crash course in floor ripping. All in all, it was a really time and labor intensive process, from cutting strips of carpet to finding and scraping linoleum glue to prying up wood boards – and don’t get me started on the hours spent pulling up and nailing down staples and nails. The staples were like an endless game of pop goes the weasel.

Q: Sounds taxing. Was this a messy undertaking?

A: Very much so. I wanted the new flooring to be level; that meant every little thing, regardless of its material, had to be swept clear before the new flooring was to be installed. This soon turned out to be a very dusty affair; if you’re allergic to dust, be sure to take your medication before starting this project. The other problem with dust is that, like sand, it will find its way everywhere. In my case, it infiltrated the cat food – the poor kitties were vomiting all night long.

Q: What was the next step?

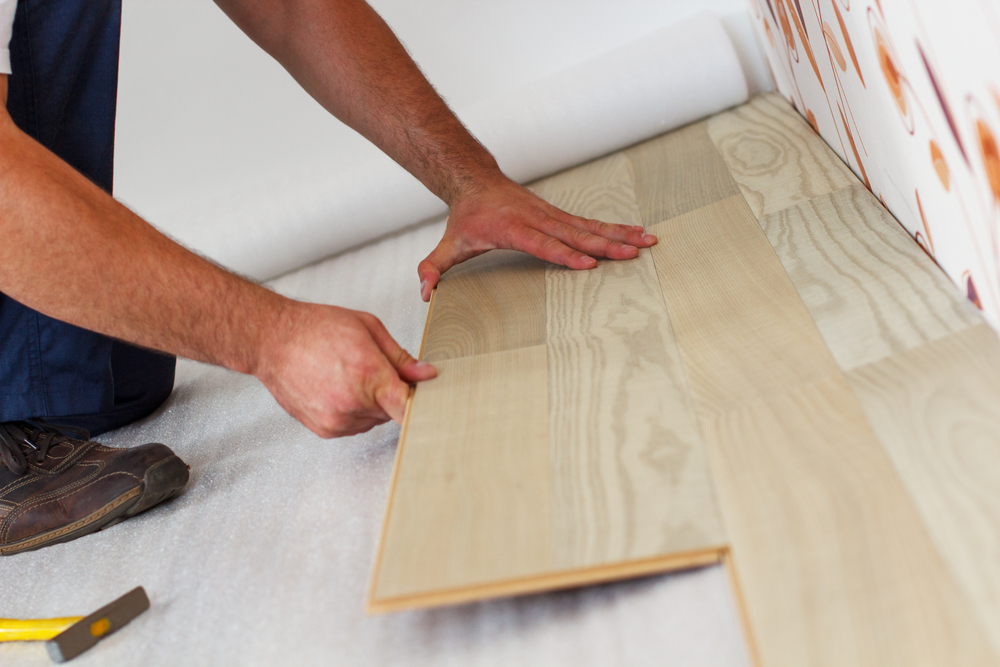
A: Then comes the actual installation. At first, it seemed like it was going to be awful because the laminate seller had unloaded this mountain of planks from an eighteen wheeler right in my garage; having to move the planks from place to place was honestly the hardest part. Installing was easier. You see, the trick is to just move in a linear fashion, like you’re mowing a lawn. The laminate we chose already had padding, and the laminate interlocks so that few pails were needed, so it was just a matter of lining everything up. As long as you keep moving in single directions, you’ll be able to cut the material to fit tight or peculiarly shaped areas. Which reminds me: this step requires some serious sawing. I had a great table saw, which only required an hour’s assembly, and was critical for precise cutting; you don’t want to waste wood, especially when a 1×2” plank bridges the space between the laminate and the wall.

Q: This all sounds like a ton of work. Was it worth it?

A: Sure, it was all hard, but remember: $2084 in savings. And the satisfaction of knowing that I made the floor myself, seeing the floor transform from an ugly patchwork to a beautiful, smooth surface – it was fantastic. Surprisingly, it proved not a bad family weekend.

And there you have it. However, some projects are too expansive to tackle even with your entire extended family. These are best handled by a professional. Head to TalkLocal and we’ll quickly set you up with the perfect contractor for free and without any hassle.

DIY Dads: The Rise and Fall of the Household Handyman

Monday, June 15th, 2015

shutterstock_264151898

Give a dad an inch and he’ll take a mile.

You know the story: he moves from paintbrushes to power washers to piles of random wrenches with a growing hardware store addiction. This is the evolution of the “Household Handyman,” the dad-turned-DIY specialist. For my dad, the transformation started when our boiler broke one fall.

A banker, he had little business intervening but he wasn’t going out without a fight. Within minutes, the hawk in a suit and tie had donned his worst t-shirt and shorts (“in case it got greasy”) and was intent on finding the Household Handyman’s Holy Grail: the boiler instruction manual.

One problem: the boiler was ten years old…finding yesterday’s instruction manual is hard enough. So, he went a-rummaging through parts of the house I didn’t know existed to emerge from the garage a half hour later, manual in hand, ambition in his eyes. It was exciting to see him march into the dark boiler room.

But Dad’s momentum soon turned to confusion, not that he couldn’t have figured the boiler out, but the chances didn’t look great; his head turned to the side at the oversized manual, a random piece of metal in his left hand. He had one trick left up his sleeve, though.

It was an old trick that he learned from Steve. Steve was a neighbor of ours and also happened to be my best friend’s dad. He was great – always there with us to play catch, drive us to the movie theater, coach our baseball team. He was a very involved father so he took all of his household maintenance tasks head-on.

At the end of the day, Steve was a tad more successful than my dad with this stuff (though he never tackled a mighty boiler). His first fix was a broken kitchen cabinet then he moved on to greater things and, before the end of the summer, he’d build his own white picket fence.

Steve’s house became a DIY playground and his next project was his roof shingling. What I didn’t tell you is that I grew up in South Carolina and Steve was so hot up there that, when he was hammering nails, a bead of sweat ran into his eye and that hammer went down right on his thumb! He didn’t surrender easily but some twenty minutes later he realized that he was moving very slowly, and had no choice but to reach into his pocket for Plan B.

What do my father’s and Steve’s Plan Bs have in common? They both involved a couch, a Heineken, the game, and a cell phone. There’s much a Household Handyman can do…but not even a 12-piece Allen key can provide a household with the convenience of a professional. Our boiler was fixed and Steve’s roof was shingled within a day.

In observance of Father’s Day, give your dedicated dad a break: see just how easy TalkLocal can make finding local service professionals.

DIY Laminate Flooring: 5 Things you Need to Know

Saturday, June 6th, 2015

shutterstock_272247716

Laminate is a versatile and relatively inexpensive flooring option. It’s also easy to find; you won’t have to drive into a town you’ve never heard of to see a specialist selling the design you’re after. For those interested in installing, say, DIY laminate flooring or wondering how to install laminate flooring, here are five quick points about the material to make your life a bit easier.

1.      “Laminate” flooring refers to the lamination process. It’s like laminating a piece of paper; this process fuses layers of different materials to create something stronger, more versatile, and better insulated. A complete piece of laminate flooring consists of a compound layer, usually made of melamine resin.

2.      Different types of laminate flooring are fused in different ways. Most laminate needs to be “tapped” together with a special tool, but some types also require gluing. Though this requires more work, glued laminate is less prone to separating after installation. Lower quality, glueless laminate is the most prone to separation, typically needing to be “re-tapped” every so often.

3.      Laminate flooring comes with rubber underlaying, on which the pieces are positioned. This makes a DIY project much easier; it allows you to figure out how to cut and align the pieces of laminate before laying them down. It also lets you decide how to cut smaller pieces to fit special areas, such as edges, cupboards, and door entrances.

4.      Though relatively durable, laminate flooring requires occasional cleaning. Water, if left too long, can infiltrate planks and cause warping, and dust and dirt particles render it more susceptible to scratching.

5.      The vinyl top of laminate flooring is very versatile in appearance. There are types of vinyl top for almost any type of wood and, recently, for many times of stone, as well. This makes laminate flooring a great choice for almost any room in the house.

If you’re wondering how to install laminate flooring, check out this article, where we ask a TalkLocal employee about her experience installing her own laminate flooring so you can see how it’s done. If you don’t have the time or would prefer the expertise of a professional, head to TalkLocal – our free service will quickly connect you to a local handyman.

Dandelion Medicinal Benefits and Other Uses for The Pretty Ragweed

Wednesday, June 3rd, 2015

shutterstock_137674295

As pretty as they are, letting dandelions grow wild and unfettered is simply not an option. Sure, the golden blooms may call to mind the raw beauty of nature; but, the resulting unkempt lawn is bound to make you a neighborhood pariah, infecting the well-manicured lawns of any neighbor within a 5 mile radius with those airborne seedlings, and draw side-way glances and blame whenever property values drop. The problem with dandelions is that they are weeds (pretty weeds) and weeds don’t belong on the lawns of responsible homeowners. In other words, dandelions must die!

Of course, it’s still a shame to let anything beautiful go to waste, especially when you can use dandelion medicinal benefits to support your body among other things. So…

Here are 4 ways to get a bit more enjoyment out of this sunny infestation once you’ve rooted it out.

WARNING: lay off the weedkillers and fertilizers if you intend to try these tricks! And, if you or a family member have ragweed allergies, you should avoid contact with dandelions or consult a doctor prior to doing so.

Dine on Dandelion: The entire dandelion is edible and delicious, if properly prepared. Check out this recipe for Sweet and Sour Dandelion Greens for just one of countless meal ideas.

Delicious Dandelion Drinks: Dandelion also makes a great tea or wine. Just check out this four ingredient dandelion wine recipe.

Doctored by Dandelion: Dandelions when eaten are high in Vitamin K (74% daily dietary value) and Vitamin A (64%), as well as Calcium (19%) and Iron (24%). Dandelions are also celebrated for their possible medicinal properties as they contain chemicals which may reduce swelling and inflammation among other ailments. Check out this step-by-step process for making your own Dandelion Infused Oil to promote healthy skin.

Dandelion Your Dirt: With all the nutrition packed into those lawn destroying dandelions, it’s easy to see why dandelion fertilizer could end up being as good for your garden as it was bad for your lawn. Here’s the basic process for making fertilizer out of any unwanted weeds.

With the unassuming beauty of the dandelion, pulling them root to stem from the lawn can be rather bittersweet. After all, who hasn’t noticed how their unruly blooms swaying serenely in the unkempt fields along the highway make a long drive feel like a pleasant stroll in the park, or how they brighten even the most decrepit and dilapidated farm house with their sunny sprouts? And who can forget the childhood memories of sending their seedlings to the wind with a gentle blow and a little prayer? At least now you know how to put these surprisingly lovely ragweeds to use, even if you can’t allow their beauty to flourish in your lawn.

And, if you need help keeping your lawn pristine, find the right local landscaper by visiting  TalkLocal or the iPhone/Android app.

Mount New Mailbox

Tuesday, April 1st, 2014

Mount New Mailbox - Handyman

Mailboxes serve a practical purpose and influence the curb appeal of any home. This is precisely why they should be carefully installed by homeowners. Do you want to mount a new mailbox on your own? In this case, check out the following guidelines to simplify your task.

Check out the mailbox guidelines offered by the United States Postal Service

The United States Postal Service (USPS) has a very specific set of rules and recommendations that you should follow, if you plan to replace your old, deteriorated mailbox with a newer model. First, you should know that there are two main types of mailboxes: wall-mounted ones and post (or roadside) mailboxes.

The USPS advises homeowners to position their roadside mailboxes up to 45” off the ground, to enable the carrier to deliver mail easily without having to get out of their trucks. Wall-mounted mailboxes should be placed up to 4’ off the ground, to ensure easy access from your steps or sidewalk.

Getting Started

If you want to install a post mailbox, follow these simple steps.

1)   Contact your utility company to make sure that you won’t start digging in an area where electrical wires or plumbing pipes are buried.

2)   Dig a 1-foot deep hole.

3)   Maintain your post in a straight position using two wood stakes and string and then fill the cavity with a concrete mix and let it dry, then remove the string and the two stakes.

4)   Attach your new mailbox by simply following the manufacturer’s instructions.

If you plan to install a wall-mounted mailbox, start by identifying the perfect spot for it. Remember that the new mailbox should be positioned in the center area of your wall. Use a level to install it in the correct position. Afterwards, mount it on your wall by using a screwdriver. The whole process is simple and hassle-free.

3)      Ask an Expert

Can’t mount the new mailbox on your own? If so, choose to hire a competent handyman. Find the best ones in your area by consulting TalkLocal, your #1 specialist when it comes to identifying A-list professionals who operate in your proximity.