Archive for the ‘Handyman’ Category


How to Install a Flag for Flag Day

Friday, June 12th, 2015

Flag Day, June 16th, is quickly approaching – don’t neglect it. This holiday calls upon us to showcase our patriotism through displays of the American flag and its colors; a great way to do this, of course, is through hanging high the old Star Spangled Banner. If you’re interested in getting a residential flag pole so you can honor the Flag on its holiday, or whatever flags you care about any time of the year, make sure you’re doing it right with this easy guide on how to install a flag pole.

1)      First, familiarize yourself with the anatomy of a flagpole; these terms will be useful in the following steps. Here’s a helpful graphic from www.netstate.com:
Pic 1

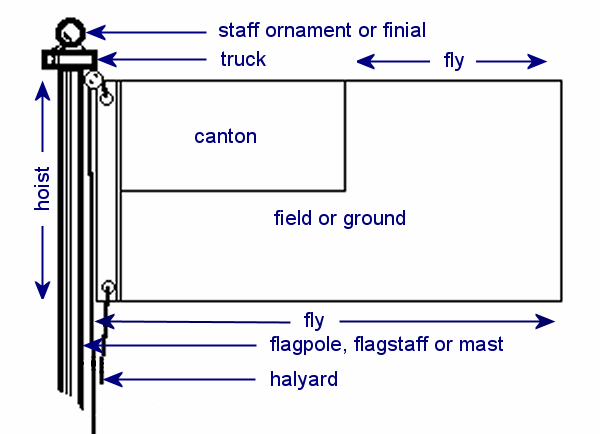
A flag is composed of the following parts:

The hoist is the height of the flag when hung.

The field refers to the area of the flag, not including the upper-left quarter, which is called the canton.

The fly is the length of the flag – the space between where it joins the flagpole and the fly end, the far side of the flag.

A flagpole is composed of the following parts:

The flagpole is the tall metal cylinder that supports the flag.

The truck tops the flagpole, with holes from which pulleys are attached.

A halyard is the rope, threaded through the pulley on the truck, that raises and lowers the flag.

The finial is an ornament that rests atop the truck.

Another important part of the flagpole is the foundation, which supports the pole from deep in the ground. Here’s a diagram of the foundation from www.flagdesk.com:

Pic 2

This foundation dimension calculator will help determine the size of the foundation hole you need to dig.

2)      24 hours before installing the flagpole, dig your foundation hole to the dimensions called for by the calculator. Set the foundation sleeve into the center of the hole, using a level on top to ensure it is flat. Let the ground sleeve stick out of the ground by two inches. Add concrete around foundation sleeve to fill in the hole and mix in water intermittently to ensure uniform thickness. A concrete to water ratio of 4:1 is typically recommended.

3)      Some concrete will come with a collar, used to elevate certain areas of concrete. Place the collar in the wet concrete around the protruding foundation sleeve and fill the area between the two with concrete. This will be used to hold the shock collar, which will protect the foundation from water.

4)      Wait 24 hours for the concrete to dry.

5)      The next day, take the flagpole and rest it on two padded sawhorses. Measure to the center of the pole and drill holes for the cleat. The size and distance of these holes will be determined by the cleat you use.

6)      Most trucks can simply be screwed into the top of the flagpole, but if it doesn’t fit tightly enough, you can caulk it over before screwing it on. The truck should have a hole on top into which the finial is inserted.

7)      Cleat off the end of the halyard.

8)      Raise the flagpole into the foundation. It can be easier to tape the shock collar to the flagpole before doing this so it doesn’t obstruct raising the flag. This task is most safely done with three people.

9)      Caulk the shock collar to the concrete. Top the concrete with gravel to improve appearance.

This is a pretty heavy DIY project and takes a few days to complete. If you don’t have the time or aren’t feeling up to it, don’t let your Flag Day display suffer – head over to www.talklocal.com and we’ll find you the perfect handyman, free of charge and without the headache.

DIY Laminate Flooring: 5 Things you Need to Know

Saturday, June 6th, 2015

shutterstock_272247716

Laminate is a versatile and relatively inexpensive flooring option. It’s also easy to find; you won’t have to drive into a town you’ve never heard of to see a specialist selling the design you’re after. For those interested in installing, say, DIY laminate flooring or wondering how to install laminate flooring, here are five quick points about the material to make your life a bit easier.

1.      “Laminate” flooring refers to the lamination process. It’s like laminating a piece of paper; this process fuses layers of different materials to create something stronger, more versatile, and better insulated. A complete piece of laminate flooring consists of a compound layer, usually made of melamine resin.

2.      Different types of laminate flooring are fused in different ways. Most laminate needs to be “tapped” together with a special tool, but some types also require gluing. Though this requires more work, glued laminate is less prone to separating after installation. Lower quality, glueless laminate is the most prone to separation, typically needing to be “re-tapped” every so often.

3.      Laminate flooring comes with rubber underlaying, on which the pieces are positioned. This makes a DIY project much easier; it allows you to figure out how to cut and align the pieces of laminate before laying them down. It also lets you decide how to cut smaller pieces to fit special areas, such as edges, cupboards, and door entrances.

4.      Though relatively durable, laminate flooring requires occasional cleaning. Water, if left too long, can infiltrate planks and cause warping, and dust and dirt particles render it more susceptible to scratching.

5.      The vinyl top of laminate flooring is very versatile in appearance. There are types of vinyl top for almost any type of wood and, recently, for many times of stone, as well. This makes laminate flooring a great choice for almost any room in the house.

If you’re wondering how to install laminate flooring, check out this article, where we ask a TalkLocal employee about her experience installing her own laminate flooring so you can see how it’s done. If you don’t have the time or would prefer the expertise of a professional, head to TalkLocal – our free service will quickly connect you to a local handyman.

How to Fix a Kicked In Door

Wednesday, May 6th, 2015

shutterstock_335149436

If you’re reading this, your door is kicked in, so either you or one of your friends has some serious anger management issues. We’ll teach you how to fix a kicked in door just this once, but as a preventative measure I’d probably head to your nearest therapist’s office…

1.     Break in the seam between the door jam and the trim

2.     Remove the strike plate

3.     Pull out the piece from the wall

4.     Remove excess wood and sand over the area

5.     Apply wood epoxy into the cracks

6.     Hold together the area using screws in the door jam

7.     Wipe off extra epoxy and after the area is dry, sand it down again

8.     Screw your new strike plate into place

9.     Nail the trim back into place

10.   Test the door!

Or if you’re not in the mood to fix your kicked in door by yourself, let TalkLocal call a professional and have this fixed for you!

Be Ready: 4 Smart Ways to Plan for Hurricane Season

Sunday, April 19th, 2015

Hurricane Season

Everyone loves the return of warm weather in the spring. However, for those of us on the East Coast, the rising temperatures come with something new to worry about – hurricane season starts in 6 weeks. If you live in a hurricane danger zone, it’s wise to start preparing now; readiness is the best way to ensure your safety and minimize damage to your home if a storm hits. Here are some tips to make sure you’re prepared for the worst.

Protect Yourself with Information

One of the easiest ways to stay safe during hurricane season is simply to stay well-informed of any dangers to yourself or your property. Learn the elevation level and flood-proneness of your home, and keep yourself updated on severe weather forecasts with your computer, TV, radio or smartphone.

Make an Emergency Plan

Knowing what to do in the event of a hurricane emergency can make a big difference. Make sure that you keep basic disaster supplies (water, flashlight, radio) accessible in your home. Also, make an evacuation plan with your family (set a meeting place and time) and practice it.

Hurricane-Proof Your Home

Doors, windows and other openings are the main points of failure when a building is damaged by a hurricane. Also of concern are dead or shallow-rooted trees, as well as lawn or deck fixtures that could become projectiles in strong winds. Fortunately, there’s a thriving industry of hurricane-proofing for these things. If you’re having trouble finding a hurricane-proofing contractor in your area, TalkLocal may be able to help.

Prepare for Repairs

If your home is damaged by the storm, getting everything fixed quickly is an essential part of returning to normal life. Have your local handyman’s number in your phone – if you don’t know who that is, use TalkLocal to find an available one near you.

Proper hurricane preparations start long before the storms have hit the ground but, as with all natural disasters, they can be daunting to think about. There are no shortcuts for educating yourself or keeping your family ready for an emergency, but for the pre- and post-storm housework, we’re here to help. Check out our Android/iOS apps or website to get connected to hurricane service professionals near you.

Three Children’s Themed Bedrooms Re-Imagined for Adult Life

Monday, October 20th, 2014

Written by Dallea Caldwell

So much of growing up is about replacing your stuff. Think about it: we go from cribs to beds and from diapers to pull-ups. We put away the action figures, the teddy bears and the Barbies. We surround ourselves with the right things and that makes us big girls and big boys.

Yet, somewhere inside, our inner-child is still trying not to suck on his or her thumb, trying to face the chill without their  security blanket and longing for the things that once gave him or her comfort and joy.

Still secretly obsessed with the themes and imagery that stoked your imagination and inspired your bedroom decor in your youth? These home decor options take classic children’s themed bedrooms and reinterpret them for your sophisticated adult life.

1. The Princess Theme: From a Princess to a Queen:

The whimsy, romantic, ultra-feminine and glamour of your old princess-themed bedroom can inspire your style without compromising sophistication. Pinks and pastels, metallic and sparkle, flowers and lace and chandeliers in the darnedest places make even the most avant-garde decor a delicious feast for the senses.

2. The Space Theme: From a Child-Wonder to…Even More Childlike Wonder:

Now that geeks are the new cool kids, maybe you can trade your rocket ship lunch box for a rocket ship suitcase. Well, that may be a bad idea, but starry skies and planetary murals can show off your style and your enduring sense of wonder, too.

3. The Superhero Theme: From Believing the Impossible to Doing the Impossible

Thank you, Roy Lichtenstein and Andy Warhol, for officially declaring that pop art is art. Now, it’s officially acceptable to pass off comic books and superheroes as pop art and icons. And, don’t be afraid to splurge on a full-fledged bat-lair for a look that says, “I’m an adult, so I bought MYSELF these toys”.

Every day we so-called grown-ups struggle to fill adult roles and fit adult expectations, while feeling as clumsy now as we did when we played dress-up in our parents’ clothing.

So, when nostalgia tugs at your adult sensibilities like a persistent child whose parents just cut through the toy aisle at Walmart on their way to the tupperware section…go ahead, get inspired and give in – if only just a little. You deserve it.

And, if your inner-child is having an all-out temper tantrum over the challenges of finding a local professional for your home-remodeling project, talklocal can spoon feed you up to 3 local pros even before the end of time-out. Just visit www.talklocal.com and enter your service details.

Ready to Take the Plunge? Consider Installing a Glass Walled Swimming Pool

Wednesday, April 9th, 2014

Ready to Take the Plunge? Consider Installing a ‘Glass Walled’ Swimming Pool - Handyman

It’s the dream of many a new home owner to complete the picturesque yard with your very own pool. Catering for exercise enthusiasts, groups of giggling children, and party guests the swimming pool add a whole new level of functionality to a property adding to its value and desirability whilst cutting family expenses on trips to the public pool or pricey water parks.

Glass Walled Swimming Pools

One of the best designs has to be the glass walled swimming pool. Just think of the great action photos you can capture without an underwater camera. So, if you’re thinking about taking the plunge and installing a pool, consider the glass walled designs.

Undeniably, pools enhance the view of anybody’s house and make it more inviting to the guests, especially when it also allows viewing the surroundings whilst swimming or view happy swimmers under the water. Pools with glass windows have gained popularity globally for their great aesthetics and entertainment value.

The style of pool you choose is dependent on many factors but if children are likely to use the pool, a glass walled installation is recommended. Giving a much clearer observation of the swimmers, glass walled pools are much safer and should a problem occur it may be spotted earlier on, saving lives.

One overlooked benefit of a transparent pool is that it allows for better observation for coaching young swimming learners. Having a great view of your student moving through the water can hugely benefit the constructive feedback you give.

Let’s take a look at the benefits:

1.     Safety

2.     A better view of both the interior and the exterior of the pool

3.     Quicker installation

4.     Easier to clean

5.     Modern look and feel

6.     Provides diving coaches an unobstructed view

7.     It makes smaller pools look spacious as it introduces more light

8.     An elegant and stunning appeal

9.     Easy to facilitate video/photographing underwater

10.  Provides a new and exciting swimming experience

Professional Installation

The certified engineers at Premium Pools can assist you in choosing the right design, measurement and glass thickness. You can also add exciting water features to make your swimming experience more enjoyable.

Premium Pools has an extremely high customer satisfaction rate and offers warranty and after sales support. So, call now or visit the website at www.premierpools.com.au.

For any questions regarding installation or maintenance of a swimming pool, use TalkLocal to be connected with a reliable professional in your area in just minutes.

Why Install Granite Mailbox Post?

Wednesday, April 2nd, 2014

Why Install Granite Mailbox Post? - Handyman

Usually, when people mention granite, what they have in mind are stylish and expensive kitchen countertops. However, granite is so much more versatile and can actually be used outside of the house right in your yard to boost your home’s curb appeal.

You can incorporate granite in your yard in several ways, without having to do a major landscape makeover. Some wonderful granite additions include granite benches, steps, and even birdbaths. One easy way to add a classy touch to your yard would be to install granite mailbox post to replace your existing wooden or metal one.

Benefits of Granite

After this winter, there’s no better time to fully appreciate the reasons why you would want to install a granite mailbox post. With a granite post, you no longer have to worry about the snowplows destroying your mailbox, which is obviously a risk with wooden posts. Obviously, granite makes an extremely durable mailbox post. It’s a hard rock with coarse grains and consists of interconnecting minerals. Once you install a granite mailbox post properly, it’s meant to be there in your front yard for good.

Aside from being naturally beautiful, granite weathers remarkably well over time. Moreover, granite requires very little upkeep and maintenance. So, it stays undamaged by ice melting substances, like mineral rock salt and melting crystals. To clean your granite mailbox post, simply brush it with a stiff scrub brush and soapy water.

Buying a Granite Mailbox Post

Most people have a mistaken belief that anything made of granite is pricey. In the case of granite mailbox posts, this is simply not true. They can be affordable if you buy from a large producer of granite products. Although light gray is the typical color associated with granite, it is actually available in other colors such as dark gray, almost black, and light shades of pink. There are also various options when it comes to finishes, including the standard rough or thermal finish, rock face, or sawed. Your granite supplier may also offer custom lettering to add your street number or family name on your mailbox post.

Let a Pro Install Your Granite Mailbox Post

If you would like to ensure proper mailbox post installation, call a professional handyman. TalkLocal will search for and connect you with three professionals who can install your mailbox post the right way. Try our easy-to-use and free service now!

Mount New Mailbox

Tuesday, April 1st, 2014

Mount New Mailbox - Handyman

Mailboxes serve a practical purpose and influence the curb appeal of any home. This is precisely why they should be carefully installed by homeowners. Do you want to mount a new mailbox on your own? In this case, check out the following guidelines to simplify your task.

Check out the mailbox guidelines offered by the United States Postal Service

The United States Postal Service (USPS) has a very specific set of rules and recommendations that you should follow, if you plan to replace your old, deteriorated mailbox with a newer model. First, you should know that there are two main types of mailboxes: wall-mounted ones and post (or roadside) mailboxes.

The USPS advises homeowners to position their roadside mailboxes up to 45” off the ground, to enable the carrier to deliver mail easily without having to get out of their trucks. Wall-mounted mailboxes should be placed up to 4’ off the ground, to ensure easy access from your steps or sidewalk.

Getting Started

If you want to install a post mailbox, follow these simple steps.

1)   Contact your utility company to make sure that you won’t start digging in an area where electrical wires or plumbing pipes are buried.

2)   Dig a 1-foot deep hole.

3)   Maintain your post in a straight position using two wood stakes and string and then fill the cavity with a concrete mix and let it dry, then remove the string and the two stakes.

4)   Attach your new mailbox by simply following the manufacturer’s instructions.

If you plan to install a wall-mounted mailbox, start by identifying the perfect spot for it. Remember that the new mailbox should be positioned in the center area of your wall. Use a level to install it in the correct position. Afterwards, mount it on your wall by using a screwdriver. The whole process is simple and hassle-free.

3)      Ask an Expert

Can’t mount the new mailbox on your own? If so, choose to hire a competent handyman. Find the best ones in your area by consulting TalkLocal, your #1 specialist when it comes to identifying A-list professionals who operate in your proximity.

Types of Knock Down Cabinet Hardware

Monday, March 31st, 2014

Types of Knock Down Cabinet Hardware - Handyman

Knock down furniture (KD) is furniture, which is ready to be assembled once you buy it and take it home. It is more affordable than other types of furniture and is specially designed for customer convenience. This goes for knock down cabinet hardware, as well.

The term knock down suggests that this type of furniture can be assembled, disassembled, and reassembled at will. It comes with pre-drilled holes, and parts can be connected with the help of fasteners included in the cabinet or furniture pack. Fasteners are made in such a way as to allow part connection and disconnection.

If you want to refurbish your kitchen, for instance, or install new cabinets, and plan to use one of many available knock down options, it’s useful to know a few things about knock down cabinet hardware.

What Are the Most Common Types of Knock Down Cabinet Hardware?

The components of knock down cabinets are packed together with the necessary assembly instructions and specific hardware. You can even install them yourself!

KD fasteners are hardware components that are used to assemble the parts of knock down cabinets or furniture. The most common types of knock down cabinet hardware or fasteners include:

Cross Dowel Fasteners

They are suitable for butt joints, which don’t involve much strain.

Draw Bolt Fasteners

These are intended for heavy-duty purposes, as they can provide more support.

Connector Bolts

These fasteners are made of a bolt and a cap nut. They can be used in the visible parts of your cabinets without impairing the aesthetics of your furniture.

Other types of knock down hardware you might come across when installing KD furniture and cabinets are zip bolts, rail bolts, mitre connectors, three wing tee nuts, threaded inserts and all fasteners.

Need Assistance?

If you need help installing your knock down cabinets or furniture, TalkLocal is here to put you in touch with a skillful handyman who can get the job done on your schedule. Just give us a call and we’ll do the rest.

Broken Fence Post Repair

Friday, March 28th, 2014

Broken Fence Post Repair - Handyman

A straight, solid fence protects property and enhances the curb appeal of a home at the same time. What happens when a fence post snaps or starts to rot? Powerful thunderstorms, heavy snows, extreme temperatures, auto accidents, and elevated levels of humidity are all important factors impacting the aesthetics and the functionality of wooden fences.

In this particular situation, you have two options at hand: you could either repair your broken fence post on your own, or you could rely on professional services brought to you by a great handyman. Here are a few steps that you should follow in case you want to conduct a simple, cost-efficient, DIY broken fence post repair project.

1)  Analyze Your Alternatives

Does your fence require a simple, quick fix, or do you need to invest in a large-scale repair project? You can discover the answer to this question by contacting a contractor and obtaining a free estimate, or you could just analyze every fence post on your own.

If more than 20% of your wooden or iron fence posts are in bad condition, it is advisable to opt for a total replacement to avoid unpredictable expenses in the long term.

Rotten or broken wood posts can be easily replaced with new ones; just make sure the color of the new element matches the shade of the old one.

If you own a wrought iron fence that is now visibly affected by rust, clean or replace the damaged posts and always try to eliminate and control rust by applying an effective anti-corrosion product suitable for various metal surfaces.

2)  The Do’s and Don’ts of Your Broken Fence Post Repair Project

If your fence post is severely damaged at ground level, it is advisable to replace it in a timely manner. Don’t try to fix it, as this method would never manage to make the old fence post stand the test of time.

Installing a solid reinforcing patch is a valid alternative only if there are approximately 7 inches between the ground level and the damaged surface. Afterward, the job can be easily completed by following 4 simple steps: get the fence panels and rails out of the way, install the fence post cup and the fence post cap, and then reassemble the boards, rails, and wires.

3)  Ask an Expert 

You could easily get the job done in less than one day, as long as you have enough time, patience, and a set of basic tools, including a hammer, safety gloves, metal flashing, tape measure, and tin snips.

If you don’t have what it takes to complete a broken fence post repair project on your own, choose to hire a skilled handyman operating in your area. Find the best one with help from TalkLocal, a free service designed to connect you with the right professionals.